Tuesday, 8 September 2020

White & pale peach foamiran roses

 Hello!

Recently, I love to sit down and make foamiran roses... I can still remember that I didn't like making them. Why? I don't know. Because they are perfect for many projects, especially in such delicate colors.




Monday, 7 September 2020

How to use Stamperia Moulds - Autumn Project

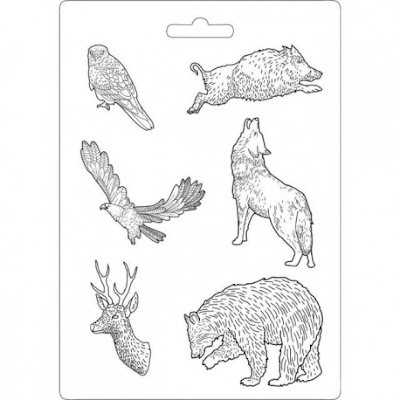
In my latest delivery from 14 Craft Bar were two wonderful Stamperia moulds - Forest Underwood and Forest animals that I knew would be just perfect to create a wonderful woodland scene. The lovely Agnieszka tucked in a packet of extra light air dry clay and a little note asking me if I would do a tutorial on how to use the moulds so here it is.


Take a lump of clay and roll it into a rough sausage shape and lay it into the mould: 


Then push the clay into all of the nooks and crannies of the mould - a dresden tool for cake decorating is helpful for small areas but is not necessary. Do not worry if the mould is over full at this stage


Use a rolling pin to push the clay over the mould and achieve a flatter back, at this stage you may not be able to see the edge of the mould you are using. Simply use your fingers to push and lift the excess clay off until you can clearly see the shape of the mould. Time spent at this stage means that there is less tidying up to do when the piece has dried.


Using your fingers gently pull back the clay from the edge of the shape, this helps to free the piece making turning out easier.


The beauty of the Stamperia molds is that they are soft which makes unmoulding easier. - use a combination of flexing the mould and pushing from below bit by bit easy your piece out. Do not worry if the mould inverts in the process of doing this as it is easily pushed back into shape once the clay has been removed. 


Now leave your pieces to dry completely before adding colour to them which will bring them to life.

I chose to use my mouldings to make a reverse canvas. To disguise the staples in the frame I used a mixture of the new rustic paints by Fabrika Decoru using red rust, iron oxide and orche. These paints are gritty and add lots of texture to the piece making them ideal for hiding things like staples and the joins in mdf projects. 

I coloured my clay pieces with shades of brown and yellow/orange paints wiping back the paint whilst damp to bring out the detail in the mouldings. Once the paint had dried I added a little white using a dry brushing technique.


For the back of my frame I used papers from Fabrika Decoru - Wood Natural 12 x 12 paper collection. Tearing strips of paper to fit my frame and overlapping them - I used strips of foam tape along one side so that the one edge was lifted up for added texture. I fussy cut out lots of paper elements from the Fabrika Decoru - Botany autumn 12 x 12 paper pack and tucked these in and around the paper strips and my clay elements. Shaping the paper images using my fingers and ball tools.

I added chipboard pieces that look a bit like spider webs to my project for another layer of detail


Finally I used some pieces of wood, acorns, cones and  lots of moss and to create the forest ground for my animals to walk on. 


Friday, 4 September 2020

Masculine card

 Hello everyone!

We always need masculine cards but I often hear they can be hard to create. Today Birthday male card was made in one breath one sleepless night and a ScrapBoys paper set had a great deal of credit for that.
The colours, designs and cutouts of a ''Flower Story'' collection work great for male cards.

To make this card I used different layering techniques with stamping, die-cutting, painting and heat embossing. It is featuring many masculine elements that you can find in 14 Craft Bar. You will find them in the list below. 


Tuesday, 1 September 2020

14 Craft Bar September Kit - Wedding Madness

  Kit of the month

We are so happy that our kits are so popular and you really like them. With great pleasure we present you our new September Kit. Every month we prepare for you kit full of amazing products like papers, chipboards, metals, ribbons etc. Some products are in the shop, some of them are exclusive and you find them only in our kit. One of our Design Team will inspire you with projects made out of the kit. Kit is very limited, we have only few sets so don't wait!!!


Kit includes:
12x12 papers Bee Shabby - Just Married. 
This paper pad contains 8 double sided printed sheets from collection + 1 bonus sheet.
Set of wedding chipboards + 3d wedding couple chipboard.
Chipboard heart shaped box.
Blank cards: cake shape, heart shape and DL size with box.
New exploding box with pockets.


Paper roses, silk flowers and leaves.


Set of laces and Shabby Ribbons in coordinating colors.


Clay hearts and frame, pearls, sequins, metal elements.