Thursday 27 July 2023

A Vintage Book Box


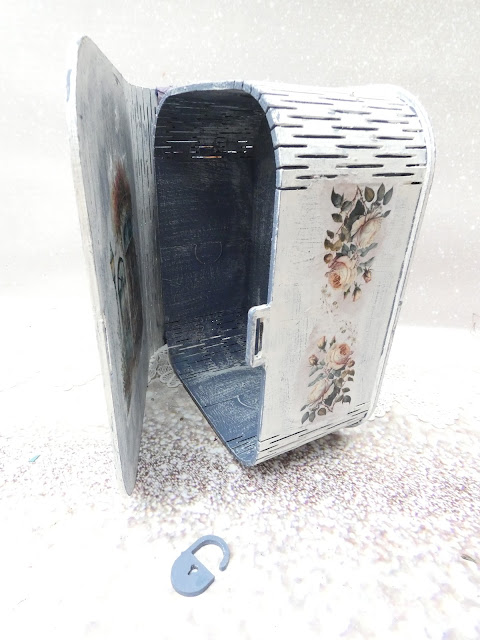
For my make this week I have chosen to work with the wide mdf book box and three different rice papers -simply beautiful 01 simply beautiful 02  and simply beautiful 03,

To start with I laid out the pieces of the mdf kit before gluing them inplace and then letting them dry completely before starting to decorate.

Once dried I painted the entire piece with a blue grey paint and left it to dry before rubbing over with a candle and overpainting with white paint leaving the inside of the box element the original colour. Once the second layer of paint had dried I then sanded back the box to give a distressed feel. There are lots of paints to choose from on the website but for this effect to work it is important that you choose contrasting colours. My preference is a dark underlayer and a paler top layer especially when adding rice papers as they blend into a pale top layer more easily with out the need for lots of paint blending to disquise the edges. The inside of the box was dry brushed with white to co-ordinate the whole look

Having finsihed the painting I tore elements from the rice papers before gluing them in place as shown in the images- my preference is to use a dedicated rice paper glue but watered down pva will work. This book box has a very large spine area which I felt looked bare and so I added several lengths of shabby ribbon from my stash wrapping the entire length twice round the spine and simply knotting them together. You could use the ones that come it the seastories kit with ribbon and add a brown tone from the selection in store. Finally I added three handmade foamiran flowers to the knot to complete the piece.





Monday 24 July 2023

Tropical pop up card

 I was aked to make holiday & coctails theme pop up card for 50 birthday. It was real pleasure to make it because who doesn't like tropical vibes and colorful coctails? Well I do! 


Friday 21 July 2023

A Perfect View - lavender card

 Hello, dears!

Today I'm here with another card inspired by my favourite Provence. This time it features a cute little window, which opens up to the endless lavender fields. Every time I use some polymer clay elements in my projects, I can't stop admiring them for their self-sufficient and beautiful decorativeness. So easy to create and so convenient to use, they add that special focal point to every composition. 


Tuesday 18 July 2023

Enchanted world - Following Alice - Gida & Aggie

 We still love Alice in Wonderland don't we? That's why this month in out joint post we decided to show you some projects made out of the latest Alchemy of Art collection -  Enchanted world - Following Alice.


- GIDA -

I absolutely fell in love with this paper collection and Alice In Wonderland has always been my favourite story since I was a child. Making these cards was super fun and brought me back to my childhood, I also stepped out of my comfort zone as they turned out rustic.


- AGGIE -
I have a box in my craft stash where I keep all the elements form different collection with Alice in Wonderland. When I saw this collection I knew I will finally use some of this fanastic elements along with these papers. 


Monday 17 July 2023

You Are My Happiness layout

For this weeks blog I have chosen to make a picture/layout depending on what you choose to use for the focal image. I have worked with the 12 x 128 x 8 and extras Sea Stories papers and combined them with lots of chipboards, and natural elements along side some hand made foamiran flowers that I made during a live for 14 Craft Bar in June. The live can be found HERE.

 I started with a 30cm square frame and took the panel out of the back to work on - I then chose one of the 12 x 12 papers and adhered it to the frame panel before adding some details by applying chipped saphire distress oxide through a leaves stencil. To decide where I was going to place the stencilled details I roughly positioned the starfish mdf shape in place. Next I covered the starfish with paper from the 8 x 8 paper pad chossing a sandy toned paper.


 Before carrying on I fussy cut out all of the images in the extras paper pack and roughly placed them to create my composition - I took a photograph as a reminder but you will notice I did not keep to it completely as my project evolved over time. I also trialed where I was going to put some chipboard pieces - choosing seaweed treasures, layered borders and a large shell which is no longer in stock but shell 2 or starfish could be used instead.

Having decided roughly how I was going to place the elements I took everything off! hence the photo and built my composition in layers - I used gel medium and glue gel to place the elments in place as this gave me lots of wriggle room for building dimension and also slipping elements under each other.

 Having placed some paper images and seawood chipboards I then decided to change up my focal image and create a shaker element. To do this I worked with sea treasures shaker box cutting the couple image from the 8 x 8 papers and adhering it on to a piece of backbround paper cut to fit the square part of the shaker box. Once the glue had dried I added some tiny beads and sequins taken from several packs from shaker set category of the website before gluing on the plastic box and then adding the two layers of chipboard. I also made up the two layers of the sea treasures borders.

With these elements in place I continued to build my composition adding more seaweed and image elements until I was happy with the over all effect. The title of the composition is a chipboard sticker taken from wedding collection just proving you can mix and match across different themes. 

For the frame itself I painted it with a mid blue shade of paint and then rubbed a candle over the surface before painting with a contrasting very soft green paint. The candle wax stops the second layer of paint adhering meaning that once the paints have dried you can then rub back the surface with sand paper to create a distressed effect. I then put the layout into the frame but felt it still lacked something - I chose to add my foamiran flowers choosing complimentary colours from the foamiran section of the website. Finally I added some clear ice gravel from a floristry wholesales along side a sprinkling of tiny shells.


I hope you like the finished piece and if you make something inspired by it please tag me so I see it.